
DevSecOps-Series: Trivy Vulnerability Scanner | Part 3
 Redha Bayu Anggara
What is Vulnerability? As per Wikipedia, “In computer security, a vulnerability is a weakness which can be exploited by a threat actor, such as an attacker, to cross privilege boundaries (i.e. perform unauthorized actions) within a computer system.” As shown in the above diagram, OS packages and language specific dependencies What is Trivy Trivyis a comprehensive security scanner. It is reliable, fast, extremely easy to use, and it works wherever you need it. It comes with differentscannersthat look for different security issues, and differenttargetswhere it can find those issues. From the documentation it says: Trivy detects two types of security issues: Vulnerabilities(known vulnerabilities (CVEs), OS package and software dependencies in use (SBOM) Misconfigurations(IaC misconfigurations, Sensitive information and secrets) Trivy can scan four different artifacts: Container Images FilesystemandRootfs Git Repositories Kubernetes Installing Trivy Installing Trivy is easy, on macOS you can use brew install trivy Creating a Docker image Create a new folder mkdir code Inside that folder, create a new file app.py from flask import Flaskapp = Flask(__name__)@app.route('/')def hello_world(): return 'Hello, World! Welcome to the Becoming DevOps guide'if __name__ == "__main__": app.run(host='0.0.0.0', port=5000) This is a simple Flask application that prints out “Hello, World! Welcome to the Becoming DevOps guide”. To dockerize this application, create a Dockerfile The requirements.txt file contains only one dependency,Flask=2.1.0 FROM python:3.7-alpineWORKDIR /appCOPY requirements.txt /appRUN pip3 install -r requirements.txtCOPY . /appEXPOSE 5000CMD ["python", "app.py"] Build the Dockerfile with: docker build -t pythonapp . After a little while the image is built: REPOSITORY TAG IMAGE ID CREATED SIZE pythonapp latest 7190ca863cca 7 seconds ago 57.1MB You can test the docker image with: docker run -itd -p 8000:5000 pythonapp Open web browser on http://127.0.0.1:8000 to see the printed message. Push the docker image to Docker Hub To push an image to Docker Hub, you must first name your local image using your Docker Hub username and the repository name that you created through Docker Hub on the web. Login to Docker Hub with docker login Tag the image using your Docker Hub login: docker tag pythonapp redhaanggara/pythonapp:v1 Push the docker image to Docker Hub. docker push redhaanggara/pythonapp:v1 Trivy Now that we have a docker image in place, we can continue with Trivy. If you just type trivy at the prompt, you will see the help page. Scanner for vulnerabilities in container images, file systems, and Git repositories, as well as for configuration issues and hard-coded secretsUsage: trivy [global flags] command [flags] target trivy [command]Examples: # Scan a container image $ trivy image python:3.4-alpine# Scan a container image from a tar archive $ trivy image --input ruby-3.1.tar# Scan local filesystem $ trivy fs .# Run in server mode $ trivy serverAvailable Commands: aws scan aws account config Scan config files for misconfigurations filesystem Scan local filesystem help Help about any command image Scan a container image kubernetes scan kubernetes cluster module Manage modules plugin Manage plugins repository Scan a remote repository rootfs Scan rootfs sbom Scan SBOM for vulnerabilities server Server mode version Print the version Scan a container image Let’s try Trivy on the docker image we just built. trivy image 71 The output should look something like this: Scan a filesystem Scan a filesystem (such as a host machine, a virtual machine image, or an unpacked container image filesystem). trivy fs --security-checks vuln,secret,config ./ The --security-checks can be configured depending on what you want Trivy to detect. Default is vuln and secret, but above we added config as well. --security-checks strings comma-separated list of what security issues to detect (vuln,config,secret,license) (default [vuln,secret] Ok, now Trivy found something 2022-09-18T19:53:51.860+0200 INFO Vulnerability scanning is enabled 2022-09-18T19:53:51.860+0200 INFO Misconfiguration scanning is enabled 2022-09-18T19:53:51.860+0200 INFO Secret scanning is enabled 2022-09-18T19:53:51.860+0200 INFO If your scanning is slow, please try '--security-checks vuln' to disable secret scanning 2022-09-18T19:53:51.860+0200 INFO Please see also https://aquasecurity.github.io/trivy/v0.32/docs/secret/scanning/#recommendation for faster secret detection 2022-09-18T19:53:52.199+0200 INFO Number of language-specific files: 1 2022-09-18T19:53:52.199+0200 INFO Detecting pip vulnerabilities... 2022-09-18T19:53:52.202+0200 INFO Detected config files: 1Dockerfile (dockerfile)Tests: 22 (SUCCESSES: 21, FAILURES: 1, EXCEPTIONS: 0) Failures: 1 (UNKNOWN: 0, LOW: 0, MEDIUM: 0, HIGH: 1, CRITICAL: 0)HIGH: Specify at least 1 USER command in Dockerfile with non-root user as argument ════════════════════════════════════════════════════════════════════ Running containers with 'root' user can lead to a container escape situation. It is a best practice to run containers as non-root users, which can be done by adding a 'USER' statement to the Dockerfile.See https://avd.aquasec.com/misconfig/ds002 Trivy found a HIGH severity. It gives you a description of the severity and link to aquasec vulnerability database to read how you can fix the problem. That’s pretty great. You can also tell Trivy to only look for issues that contains the severity HIGH. trivy fs --security-checks vuln,secret,config --severity HIGH ./ Scan a Git repository To scan a remote git repository trivy repo https://github.com/knqyf263/trivy-ci-test There are many more things you can do with Trivy and I recommend that you check out the documentation to play around with it some more. As always, if you found this useful, please hit that clap button and followme to get more articles on your feed. :) Installation Easily install Trivy depending on your OS and check this for more info. For homebrew users, just execute the following command. brew install aquasecurity/trivy/trivy Run the vulnerability scan As discussed earlier, the scan can be carried out on container images, file systems and git repositories. Let’s see the basic commands to be executed for each scenarios and what is happening behind the scene. Container Images trivy image [image-name] Container image scanning steps — source File systems trivy fs /path/to/project File systems scanning steps — source Git repository trivy repo [github-repo-url] Remote Git repository scanning steps — source As shown in above diagrams, when the scan is started, a database (trivy-db) consists of known vulnerabilities will be downloaded to cross check the installed packages of your application and finally output a summary of the security issues as shown in above diagrams. You can skip downloading the vulnerability database by the flag--skip-update if you have recent copy of it. trivy repo --skip-update [github-repo-url] Also there can be large file systems or repositories to be scanned which caused exceeding the upper limit of open file descriptors. In that case you can set the ulimit by ulimit -n 1024 . The vulnerabilities can be catagorized based on the severity of them like critical, high, medium etc. The Trivy scanner also output the vulnerabilities accordingly and we can filter out the vulnerabilities according to the severity by the flag --severity HIGH,CRITICAL . trivy repo --severity HIGH, CRITICAL [github-repo-url] The Trivy scanner traverse through the directories and files of the given file system and it could be configured to skip files or directories if needed. trivy repo --skip-files "file1" --skip-files "file2" --skip-dirs "dir1" --skip-dirs "dir2" [github-repo-url] The Trivy scanner exit with code 0 by default and it can be configured the exit code as 1 only if critical vulnerability is detected as follows. These type of configurations are useful when integrating the Trivy scanner with CI/CD pipelines. trivy repo --exit-code 1 --severity CRITICAL [github-repo-url] The output report format could be configured to be as tabular (default), json or custom template. Tabular format on the terminal. trivy repo -f table [repo-url] JSON output trivy repo -f json -o results.json [repo-url] Custom template. trivy repo --format template --template "@html.tpl" -o report.html [repo-url] Find the “html.tpl” file from here. There are lot more we can do with Trivy scanner like scanning configurations files like IaC files for detecting misconfigurations. trivy config [path to IaC files] Referenfces: https://anaisurl.com/trivy-operator/

Pipeline Apache Flink, Kafka, Postgres, Elasticsearch, Kibana For Real-Time Streaming
Redha Bayu AnggaraBuilding Real-Time Data Streaming Pipeline using Apache Flink, Kafka, Postgres, Elasticsearch, Kibana

DevSecOps-Series: SonarQube | Part 9
Redha Bayu Anggarainstalling, Running Sonarqube Integrate into Azure Pipelines and Examining The Test Results from The SonarQube Dashboard.

DevOps, DevSecOps, FinOps, MLOps, DataOps, GitOps
Redha Bayu AnggaraDive deep into the world of FinOps, DevOps, and DevSecOps. This guide elucidates their lifecycles, differences, and best practices. Whether you’re new to these methodologies or looking to refine your understanding, this article has got you covered. DevOps DevSecOps FinOps MLOps DataOps GitOps DevOps DevOps is a holistic approach that combines continuous software development, integration, testing, deployment, and monitoring. It champions innovation, agility, and scalability, fostering a culture of continuous learning and feedback. DevOps best practices DevOps has transformed software development in the IT sector. For successful implementation, it’s essential to focus on collaboration, set clear objectives, choose the right tools, and prioritize security. “Ian Head, research director at Gartner, predicts that 90% of infrastructure and operations organizations attempting to use DevOps without specifically addressing their cultural foundations will fail.” This is why you need to implement best practices that cover the full spectrum of a project lifecycle: Collaboration: Encourage cross-functional, synchronous, and asynchronous collaboration between colleagues. Continuous learning and improvement are part of the game requiring patience and constant monitoring. Practice shifting that takes time: Switching a complete way how teams work is a cultural and practical shift that requires patience, dedication, and ideologies behind adopting new ones. Get everyone on the same page and clear any doubts or queries before they emerge. Set performance ROI: Define clear objectives since day one of the process initiations. Metrics perfectly serve the purpose of acting as evidence of transformational efforts to upper management and internally. Have the right toolchain: Automation is a crucial DevOps component that makes an engineer’s life easier. Setting up a smart selection of tools can help prevent disputes between the development and operations teams. Prioritizing processes over tools is a great idea. Long-term goals: DevOps is not a magic bullet. It is a long enduring, and complex journey toward great results that may or may not require a lot of resources. Focus your energy on securing the acceptance of critical organizational POCs. Dashboard & KPIs: An automated dashboard can keep track of the SDLC process and maintain a database of the changes made to the server. They provide a holistic view of all the completed updates and completed changes. Automated dashboards enable it to provide detailed insights and reports about different operations. Security is a priority: The recent increase in data breaches and security threats over the years has made it essential for businesses to be aware of the risks and implement foolproof security measures to protect their software. Companies should ensure that IP source code is accessible only to trusted users with verified credentials, and test and build scripts should not contain credentials accessible from any system. DevSecOps DevSecOps, standing for development, security, and operations, integrates security throughout the IT lifecycle. It ensures that security is a shared responsibility, protecting both the environment and the CI/CD process. Is DevSecOps for everyone? DevSecOps is essential in today’s business environment to mitigate the rising frequency of cyber-attacks. By implementing security initiatives early and often, applications and infrastructures in various industries achieve the following benefits. Obviously, all businesses require a DevSecOps mindset but governments, healthcare, and financial services require additional attention to details. What are the benefits of DevSecOps? DevSecOps offers enhanced application security, promotes cross-team collaboration, streamlines application delivery, and limits security vulnerabilities: Enhanced Application Security: In the past, the security role was isolated to a specific team in the final stage of development. Effective DevOps ensures rapid and frequent deployments closer to weeks, days, and minutes. Security is a shared responsibility integrated from end to end, building a security foundation into DevOps initiatives. It means thinking about application/infrastructure security right from the start. It also means automating security gates and keeping the CICD workflow from slowing down. Cross-team ownership: DevSecOps brings together 3 very different profiles, building a collaborative cross-team approach. Everybody is on the same page early, leading to more efficient team collaboration. Streamline application delivery: Security best practices enable fast deployment cycles thanks to automation, enhanced reporting, and enabling compliance teams. When a security threat is identified, application and development teams will work on solutions at the code level to address the problem. Before deployment, organizations need to ensure their infrastructure complies with security policies. Defining how the workload should run, providing critical insight into potential vulnerabilities and misconfigurations, and setting subsequent stages of the CI/CD pipeline up for a successful deployment. Limit security vulnerabilities: Identity, manage and patch common vulnerabilities and exposures (CVE) can be identified in pre-built scanning solutions earlier and more often. Remediate quickly when vulnerabilities are first discovered, streamlining agile development processes. Secure APIs increase authorization and routing visibility. By reducing exposed APIs, organizations can reduce surfaces of attacks. FinOps FinOps, a fusion of ‘Finance’ and ‘DevOps’, emphasizes collaboration between finance and engineering teams. It’s a practice that leverages data to optimize costs and enhance visibility. The Role of FinOps in Modern Tech Architecture FinOps operates in three phases: Inform, Optimize, and Operate. It’s about ensuring ROI, optimizing cloud resources, and setting up governance models: Inform: Empower organizations and teams with visibility, allocation, benchmarking, budgeting, and forecasting. An accurate distribution of cloud spending based on tags, accounts, and business mappings enables valid chargeback and showback. Stakeholders want to ensure they are driving ROI while staying within budget. Optimize: Once businesses and teams are informed and empowered, they need to optimize their cloud footprint. While cloud providers offer multiple levers to do so, on-demand capacity remains the most expensive, encouraging advanced reservation planning and increased commitments. Rightsizing and automating turning off any wasteful use of resources can help optimize the environment. Operate: Organizations assess and analyze business goals and metrics they can track, measuring their evolvement. These objectives are tracked daily. They measure business alignment based on speed, quality, and cost. Defining appropriate policies and governance models is a best practice. MLOps MLOps are derived from machine learning (ML) and operations (Ops). It is a set of management practices for the deep learning and production ML lifecycle. MLOps promotes communication and collaboration between operational professionals and data scientists. This approach aims to improve the quality of the production ML and increase automation by focusing on legal and business requirements. MLOps covers the entire ML lifecycle, including the software development lifecycle and integration with the model generation, including continuous integration and deployment; effort; orchestration; management; health and diagnostic monitoring; and analysis of business statistics. What is the MLOps lifecycle? DataOps DevOps is commonly associated with Agile promoting short development cycles, many iterations, and more frequent deployments. This approach aims to continuously deliver software, taking into account user feedback to gain more business opportunities. It shares the same principles applied to the data processing to ease and accelerate data analytics deliverability. DataOps allows: A complete alignment between teams to deliver value faster through predictable data delivery Improves data quality across the data pipeline Encourages reproducibility by eliminating recurring tasks between projects What is the DataOps lifecycle? GitOps GitOps is an approach that uses Git repositories as a single source of truth to deliver infrastructure as code. All code changes are tracked, making updates easy while providing version control if a rollback is needed. GitOps delivers: Standard workflow for application and infrastructure development Increase security for setting requirements upfront Improved reliability with clear visibility and control throughout the pipeline Consistency across any cluster, cloud, or on-premise environment

Good DevSecOps Series | Part 1
Redha Bayu AnggaraIntroduction: Welcome to the End-to-End DevSecOps Kubernetes Project guide! In this comprehensive project, we will walk through the process of setting up a robust Three-Tier architecture on AWS using Kubernetes, DevOps best practices, and security measures. This project aims to provide hands-on experience in deploying, securing, and monitoring a scalable application environment. Project Overview: In this project, we will cover the following key aspects: IAM User Setup: Create an IAM user on AWS with the necessary permissions to facilitate deployment and management activities. Infrastructure as Code (IaC): Use Terraform and AWS CLI to set up the Jenkins server (EC2 instance) on AWS. Jenkins Server Configuration: Install and configure essential tools on the Jenkins server, including Jenkins itself, Docker, Sonarqube, Terraform, Kubectl, AWS CLI, and Trivy. EKS Cluster Deployment: Utilize eksctl commands to create an Amazon EKS cluster, a managed Kubernetes service on AWS. Load Balancer Configuration: Configure AWS Application Load Balancer (ALB) for the EKS cluster. Amazon ECR Repositories: Create private repositories for both frontend and backend Docker images on Amazon Elastic Container Registry (ECR). ArgoCD Installation: Install and set up ArgoCD for continuous delivery and GitOps. Sonarqube Integration: Integrate Sonarqube for code quality analysis in the DevSecOps pipeline. Jenkins Pipelines: Create Jenkins pipelines for deploying backend and frontend code to the EKS cluster. Monitoring Setup: Implement monitoring for the EKS cluster using Helm, Prometheus, and Grafana. ArgoCD Application Deployment: Use ArgoCD to deploy the Three-Tier application, including database, backend, frontend, and ingress components. DNS Configuration: Configure DNS settings to make the application accessible via custom subdomains. Data Persistence: Implement persistent volume and persistent volume claims for database pods to ensure data persistence. Conclusion and Monitoring: Conclude the project by summarizing key achievements and monitoring the EKS cluster’s performance using Grafana. etc Prerequisites: Before starting the project, ensure you have the following prerequisites: An AWS account with the necessary permissions to create resources. Terraform and AWS CLI installed on your local machine. Basic familiarity with Kubernetes, Docker, Jenkins, and DevOps principles. Chapters: Introduction| Part 1 Corporate DevOps Security Tools | Part 2 Trivy Vulnerability Scanner Tool For | Part 3 Real-Time AWS Security DevOps Tool | Part 4 Dockle Container Security Diagnosis | Part 5 Jenkins | Part 5 Kubernetes | Part 6 Nexus | Part 7 Sonarqube | Part 8 Ansible | Part 9 Argo | Part 10 Gitlab | Part 11 Nexus Repository | Part 12 Datree | Part 13 Teraform | Part 14 Grafana | Part 15 Prometheus | Part 16 ELK Stack, Apache Flink Kafka Elasticsearch Kibana Docker Minio Iceberg DynamoDB Furthermore, there are various popular tools integrated such as nmap for network scans, Gitleaks for secrets detections, and much more.
Discovery, Monitoring and TroubleShoot | Part 1
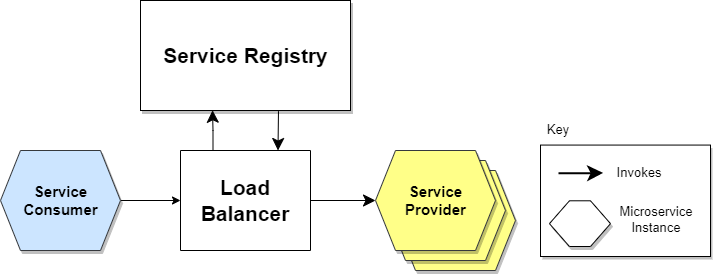
Redha Bayu AnggaraChapters: Service Discovery, Monitoring and Troubleshooting | Part 1 Grafana Monitoring Workflow | Part 2 Devops Workflow Troubleshooting | Part 3 Carry away Consistensy Pattern | Part 4 DevSecOps Development, Security and Operation | Part 5 Distributed Systems and Orchestration Docker And Swarm | Part 6 Service Discovery Workflow The service provider shares its IP address and port number for registration with the service registry. A periodic heartbeat signal is utilized to indicate the current status of a service instance. By users the publish-subscribe pattern, reliable service discovery can be implemented. In this approach, service consumers are advised to subscribe to the desired service providers listed in the service registry. As any modifications occur in the service providers, the service registry proactively notifies the subscribed service consumers of these changes. Hyperscale Hypergrowth occurs when growth exceeds the expected level by more than 40%. Yet most companies with hypergrowth fail due to scalability problems. So they need to hyperscale. Hyperscale is the architecture’s ability to scale quickly based on the changing demand. It needs extreme parallelization and fault isolation. So he was frustrated. Titanic’s Designer Talking About Its Resilience Until one weekend he watches the film Titanic on television. The scene in which the ship’s designer talks about its resilience caught his attention. Vertical Partition Walls Dividing the Ship’s Interior Into Watertight Compartments They partitioned the ship's interior using vertical walls. Thus compartments become water-tight and self-contained. And the ship wouldn't sink unless many compartments were affected. Pointer (Featured) If you find system design useful, consider checking out Pointer.io. It’s a reading club for software developers read by CTOs, engineering managers, and senior developers. They send out super high-quality engineering-related content and it’s completely free! Cell Based Architecture Here’s how cell based architecture works: 1. Implementation A system is divided into cells and the traffic gets routed between the cells using a cell router. A cell might contain many services, load balancers, and databases. And it’s technology-agnostic. Put another way, a cell is a completely self-contained instance of the application. So it’s independently deployable and observable. The customer traffic gets routed to the right cells via a thin layer called the Cell router. Cell Based Architecture The failure of a cell doesn’t affect another one because they are separated at the logical level. In other words, cell based architecture prevents single points of failure. A cell could be created using an infrastructure as a code script or any programming language. While each cell gets a name and a version identifier. The components within a cell communicate with each other through supported network mechanisms. While external communication happens on standard network protocols via a gateway. Reducing Scope of Impact With Cell Based Architecture, A cell shouldn’t share its state with others and handle only a subset of the total traffic. Thus the impact of a failure like a bad code deployment is reduced. If a cell fails, only the customers in that specific cell are affected. So the blast radius is lower. Put another way, if a system contains 10 cells and serves 100 requests. The failure of a single cell affects only 10% of requests. Blast radius is the approximate number of customers affected by a failure. 2. Key Concepts Here are some key concepts of cell based architecture: a) Customer Placement The cells get partitioned using a partition key. A simple or composite partition key can be used to distribute the traffic between cells. And the Customer ID is a candidate partition key for most use cases. Mapping Customers to Right Cells The cell router forwards requests to cells based on the partition key. Consistent hashing, or range-based mapping algorithms can be used to map customers to cells. Provisioning Cells Based on the Number of Customers The number of customers supported by a specific cell depends on its capacity. And a service can be scaled out by adding more cells. b) Cell Router A simple router can be implemented with a DNS. While an API gateway and a NoSQL database like DynamoDB can be used for complex routing. The routing layer must be kept simple and horizontally scalable to prevent failures. Routing Traffic to the Right Cell A dedicated gateway can be installed on each cell for communication. And it becomes the single access point to the cell. Alternatively a shared gateway can be set up via a centralized deployment. The gateway provides a well-defined interface to a subset of APIs, events, or streams. c) Cell Size Each cell must have a fixed maximum size. Thus the risk of non-linear scaling factors and contention points gets reduced. Also scaling out and stress testing is easier with fixed-size cells. So the mean time between failures (MTBF) is higher. And the number of hosts that need to be touched for deployments and diagnosis is reduced. So the mean time to recovery (MTTR) is lower. Yet the cell boundary depends on the business domain and organizational structure . Cell Size vs Benefits The blast radius is smaller when there are many small cells. Yet capacity is better used with a few large cells. So an optimal cell size must be chosen for best performance. d) Cell Deployment A deployment must be tested on a single cell before rolling it to others for safety. Cell Deployment in Waves So the cells get deployed in waves and the metrics are monitored. A deployment is rolled back if there is a failure and a new wave gets introduced. 3. Use Cases Some use cases where cell based architecture is a good fit are: Applications that need high availability High-scale systems that are too big to fail Systems with many combinations of test cases but insufficient coverage The cell boundaries provide resilience against failures like buggy feature deployments. And it avoids poison pill requests by limiting the scope of impact. Resilience is the ability of the system to recover from a failure quickly. A poison pill request occurs when a request triggers a failure mode across the system. Benefits of Cell Based Architecture The cell based architecture makes the design more modular and reduces failover problems. Besides issues due to misbehaving clients, data corruption, and operational mistakes gets prevented. 4. Best Practices Here’s a list of best practices with cell based architecture: Start with more than a single cell from day 1 to get familiar with the architecture Consider the current tech stack as cell zero and add a router layer Perform a failure mode analysis of the cell to find its resilience A single team could own an entire cell for simplicity. But with cell boundary on the bounded context Cells should communicate via versioned and well-defined APIs Cells must be secured through policies in API gateways Cells should throttle and scale independently The dependencies between cells reduce the benefits of cell based architecture. So they should be kept minimum There shouldn’t be shared resources like databases to avoid a global state The cells should get deployed in waves 5. Anti-Patterns Here’s a list of common anti-patterns with cell based architecture: Growing the cell size without limits Deploying code to every cell at once Sharing state between cells Adding complex logic to the routing layer Increased interactions between cells 6. Cell Based Architecture vs Microservices A cell could represent a bounded context. And it can be implemented as a monolith, a set of microservices, or serverless functions. Bounded Context in Domain-Driven Design (DDD) is the explicit domain model boundary. Repository: https://github.com/ogrisel/docker-distributed

The most insightful stories about Kotlin
Redha Bayu AnggaraOverview Develop fully functional Android App in Android Studio using the power of Kotlin programming language. Chapter Develop a fully functional Android App Food Recipes Android app ROOM Database Dependency Injection - Dagger-Hilt Retrofit Offline Cache Local & Remote Data Sources Kotlin Kotlin Coroutines Android Architecture Component Navigation Component DataStore Preferences Data Binding ViewModel AndroidViewModel LiveData Flow DiffUtil RecyclerView Search Recyclerview REST API Client - Server Communication Send HTTP Request Parse HTTP Response Dark and Light Theme Night Mode Motion Layout Material Components Material Design Create Shimmer Effect Database Inspector ViewPager ViewPager2 Create Contextual Action Mode Share Data with Other Apps Create Modal Bottom Sheet Nice looking UI Design Migration from kotlin-android-extensions plugin And more... Create a fully functional Android application using the power of Kotlin programming language. lets going to develop one application being a sample. Remote data source we will use a third party API for called. So what are you waiting for, let's get started developers! Working on Android has plenty of facets, one of them is gradle, configuring it can be hard sometimes but it is very rewarding, in most serious companies there are people specialized in the gradle build. So I want to learn more about gradle and challenge myself to create a simple Kotlin project using and then running in Android Studio to leverage the power of the IDE. 1. Install Kotlin Use the installer of your choice, see the manual (brew, sdk, ports) Using brew it would be brew install kotlin If the only things you want to do is to create a hello world, then you can just do this and run it using the terminal following the above documentation. 2. Install Gradle This should not mess with your Android Studio projects because Android projects use a dynamic gradle online, that is why you can configure offline on Android Studio. If offline Android Studio peak your interest this article should help you (I have mixed experiences using offline, not a recommendation neither discourage, find your flavor). Again use the installer of your choice for installing gradle, see the manual With brew it will be brew install gradle You need to have Java before this, if you are coming from Android Studio this shouldn't be a problem. 3. Create a Gradle project We are now gonna create a gradle project using the cli, there is some info on the Gradle and official Kotlin but I was confused, so I rather give you my own recipe based on those. Create the project mkdir devDotTo cd devDotTo gradle init That will trigger the interactive CLI, is literally reading what it says and following it, but since I'm clueless I got tons of mistake, so let me spare you the trial and error. Select Library (number 3 and enter) Select Kotlin (number 4 and enter) This last selection is the language used for the gradle files, so choose the one you are more comfortable. I'm used to Android, so I like groovy, and I won't change to the Kotlin extension until I deeply understand what am doing. The next 2 options are naming so you can type whatever suits you and your standards or just press enter twice. This creates a template project with one default class and a default test, we will have to modify that a little on Android Studio. 4. Run it using Android Studio Open Android Studio and open the project, click on the directory and click on open Let Android Studio do the thingy... blow some air on your computer if you need to cool it, xD Seriously, if you are used to Android projects, you can select the "Android" vision on the pane A.K.A. the left tab with the files Open the file Library.kt is gonna be the only file there. We are going to add the main method so we can configure our IDE to run it. There is a default method, if you remove it, make sure to remove it on test folders as well. Your file should look like this: class Library { companion object { @JvmStatic fun main(args: Array<String>) { println("DEV DOT TO") } } fun someLibraryMethod(): Boolean { return true } } As you can see we have to add it inside the companion object. Now we are going to configure Android Studio to run it. Click on "Add Configuration" on the top bar In the dialog that shows up, don't click the templates, click the plus button (you don't want to edit a template, you want to use a template to create a configuration). Select the Kotlin template: Now you have to select the Main class, if you press on the 3 dots, you will see it right away because it has the main method Now the only thing you have to do is save the configuration. The default name is "Unnamed" I like naming it "Run". You can click on the run button or ctrl + r on Mac and in Windows shift+F10 Hooray! We have our logs in the console

Flutter On Rails
Redha Bayu AnggaraThis tutorial will walk you through how I built this application. Checkout the demo and the repos below base on your own behalf. Rails Repo => https://github.com/redhaanggara21/Fluttering_on_Rails_db Flutter Repo=> https://github.com/redhaanggara21/Fluttering_on_Rails_Front Create a New Flutter and Rails Projects Start a normal Flutter project and start a Rails project in API mode by using the command: rails new --api flutter_crud Generate an Item Model We could just generate a scaffold and make our lives easy and if thats what you want to do you can run (from the directory holding your rails app). rails g scaffold Item name:string price:integerrails g model Item name:string price:integer if your new to Rails the first command generates both a model and a CRUD controller for the Item model. The second command only generates the model itself. In Rails a model is a way of representing data from the database as a ruby object. This is easier then directly dealing with the database itself because we no longer have to write SQL or PG queries by hand. lets migrate our database: rails db:migrate Generate an Item Controller A controller is a way for users to interact with the application. In rails controller’s are classes and the methods of the class are called actions. Each action is requested via a HTTP request, from there the action does what we program it to do ie. Create,Read Update or Destroy. Rather then having our views shown in HTML format we will have pages in our flutter application act as our views. If your not familiar with MVC architecture read: To generate a new controller run the command: rails g controller v1/Items Usually we don’t prefix controllers with things like v1 but doing so makes it easier to control the API version we are working with, v1 ie. version 1. head to the app/config/routes.rb file. This file is where we specify the relationship between our application URLs and the actions of our controller. In this file add: namespace :v1 do resources :items end using the namespace block with the v1 symbol prefixes all of our items controller actions with /v1. The Resources method makes CRUD urls, and the subsequent actions of the items controller available.All request to the items_controller will follow this format: base_url/v1/items/action_name If your application is running locally the base_url will be localhost:3000. To see the new routes, the actions and the keywords they correspond with you can run: rails routes That concludes this post, in our next post we will start by creating the Create action in our items controller and begin designing the home and create screen of our flutter UI. Stay tuned !

Introduction NestJs and Kotlin Multi Platform | Part 1
Redha Bayu AnggaraAPI request in Android the easy way using Kotlin Chapters: Introduction Start Project Connecting Nestjs Using Typeform KMM Consume API Authencation Crud Operation Kotlin is a really powerful language aimed to write more code using less boilerplate. And this is specially true in Android. Apart from the language itself and its own classes, Kotlin also provides a good set of useful extensions for already existing Java classes. An example of this is the way to make a request to an API and download the result. I know that a lot of different libraries already exist to help us do this task, and Kotlin can make use of them because of its interoperability with Java, but we sometimes use big libraries to commit small requirements only because it’s much simpler and less prone to errors. API Request: Java vs Kotlin I always like to compare both languages to see what we are missing by sticking to Java. The typical code to recover a json from an url is this: Kotlin standard library provides an extension function for URL class that prevents us from having to write all that code. This function is not recommended for huge responses, but it will be enough in most situations. If it is not, there are many other interesting extension functions such as BufferedReader.forEachLine(), which creates a Sequence of the lines and let us do something with any of them. Or you can get the raw Sequence by using BufferedReader.lineSequence(). From this moment, you could perform any of the different transformations a Sequence allows, such as filtering, sorting, mapping, etc. Asynchronous call As you know, the main thread is in charge of UI rendering and interaction, and we shouldn’t block it with long tasks, because the UI performance will be affected. In the case of HTTP requests, even the Android SDK will prevent us from doing it by throwing an exception. The typical solution in Android is the use of AsyncTask. An AsyncTask has an abstract method called doInBackground, which is executed in a secondary thread. Apart from the fact that it’s really difficult to make an AsyncTask work properly, because of the many problems it brings with itself, it’s really tedious to create a new class which extends from it, cancel it in onDestroy, etc. A very simple version of this (you’d probably need more checks to avoid crashes) would be: [java]@Override protected void onCreate(Bundle savedInstanceState) {super.onCreate(savedInstanceState); task = new AsyncTask<Void, Void, String>() {@Override protected String doInBackground(Void… params) {return requestFromServer("<api call>");} @Override protected void onPostExecute(String s) {if (!isFinishing() && !isCancelled()) {Log.d("Request", s);Toast.makeText(ExampleActivity.this, "Request performed", Toast.LENGTH_LONG).show();}}};} @Override protected void onDestroy() {super.onDestroy(); if (task != null) {task.cancel(true);task = null;}}[/java] Not really clean nor intuitive. When we are working with Kotlin in Android, a library we can’t miss is Anko. It’s main goal is to provide a DSL to create layouts using code instead of XML. I’m really used to XML, so at the moment I don’t use it for that, but it includes a whole set of extremely useful features. In particular, there’s a small DSL for asynchronous tasks. The previous code could be reduced to this in Kotlin: [scala]async {val result = URL("<api call>").readText()uiThread {Log.d("Request", result)longToast("Request performed")}}[/scala] Basically you have an async function that will execute it’s code in another thread, and will give the chance of returning main thread using uiThread. async is an extension function implemented for Context, and will use a weak reference of it, so it won’t prevent GC from releasing its memory. The good part about uiThread is that it’s implemented differently depending on the class it uses. If we call it from an Activity, the uiThread code won’t be executed if activity.isFinishing() returns true, and it won’t crash in that situation. async returns a java Future, in case you want to work with futures. And if you need it to return a future with a result, you can use asyncResult. You also can use your own executor